Pro Tools Editing Tutorial
By Christopher Lee
One of the most powerful tools in any major DAW (digital audio workstation) is the ability to edit audio files. Technology has come a long way since the days when engineers would edit audio by splicing bits of tape together; modern DAWs, such as Pro Tools, Logic, Reaper, Cubase, and Nuendo are able to facilitate surgical edits within the timeframe of a few milliseconds.
This tutorial will walk you through the procedures you’ll need to master in order to complete a specific assignment: taking a single audio file with the alphabet recited in the wrong order, and correcting it through editing.
I’ll be using Pro Tools, but most DAWs will have a similar editing workflow, though the tool names and other menu items may be different.
1.) Start by importing your audio file(s). Go to File > Import > Audio. In the dialogue window that appears, make sure to “Copy” the file to your session, so a copy of the audio file will be created in the session Audio Files folder. You want to keep all of your audio in the session folder so Pro Tools knows where to look for your files the next time you open the project.
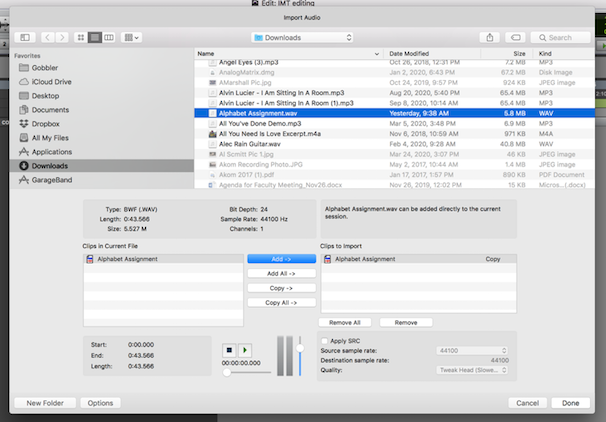
2.) Make sure you select the Audio Files folder of your PT session as the destination. Select “new track” for your audio, and align it to the session start.
3.) To add a click track (metronome) to your session, go to Track > Create Click Track. You can adjust the playback level of the click either by dragging the automation line within the track itself, or clicking on the little green “v”, which gives you a pop-up volume fader.

4.) Set your tempo to 120 beats per minute (bpm) in the MIDI tempo control box. In the edit mode resolution box, you can choose which note value is represented in the timeline grid. In my session, I’ve selected quarter notes, so those are the note values shown by the light gray vertical lines in my timeline. Measure numbers will appear in the bars/beats ruler strip. In the screenshot below, you can see I have five measures in 4/4 meter, with four grid lines (representing quarter notes) in each measure.


5.) To place each letter in time with the click track, I’ll start by creating markers for each letter. At this tempo, one letter every two beats feels natural to me. Notice in the screenshot above, the edit mode is set to “grid.” This snaps my edits to the note grid I’ve selected, and allows for faster editing of grid-based audio clips.
To place markers, use the select tool to place your cursor on a beat. (I’ll start my alphabet on beat 1 of bar 2 to give me a bit of lead-in time.) To open the marker dialog box, after you place your cursor in the right spot, click on the “+” to the right of the “Markers” ruler strip. Change the marker (or memory location) name to A.


6.) I’m going to do the same for each letter, every two beats.

7.) Next, I’ll move the audio file to a second track, where I’ll cut it up into separate letters, then arrange them in the correct order in the track above. I’ll zoom in using the zoom tool (the magnifying glass), and use the waveform zoom tool in the view selector to make the waveform easier to see. Switch into slip mode, which allows you to edit freely along the timeline. Use the select tool to highlight the letter A, and cut the selection using either cmd-x (which moves the selection to the clipboard) or cmd-e (which cuts the selection, but doesn’t remove it from the track).
Using the grabber tool, slide the audio clip to the correct marker, and line up the transient part of the waveform with the grid line. You can see below that the audio is aligned with bar 2, beat 1 (marker A).

8.) Cut the letter B from the audio track and move the clip to the correct marker in the track above. To avoid clicks or pops when you play back your alphabet, you will need to create fades and crossfades as well. Fades are segments at the beginning or end of a clip where the volume increases to the desired level from silence, or decreases to silence. Crossfades are segments between adjacent clips, where the volume of the first clip fades to silence while the volume of the second clip increases to the original level. The effect, if the crossfade is short, is a seamless transition between the clips. We need to do this to avoid a discontinuity in the two waveforms, as shown below:

A discontinuity like this, where the waveform doesn’t travel smoothly back over the zero crossing, will produce an audible pop or click. A crossfade will eliminate that noise. Usually, we try to find segments of audio that are close to silence in which to make our edits. Adding crossfades doubly ensures that no audible artifacts are produced.
In the screenshot below, I’ve added a crossfade between clips, as well as a fade into the first clip from silence:

In slip mode, I first lined up the transient part of the B with the correct grid line, then added a crossfade. You can do this by highlighting a short segment around the edit, then going to Edit > Fades > Create. You can also use the smart tool, and hover near the bottom of the edit. A little crossfade graphic will pop up. Click on it and drag the cursor to set the length of your crossfade. If you use the smart tool and hover near the top of a clip, you can create a fade in or fade out. In the picture above, I’ve made a fade in to the letter A.
Using fades consistently is a good idea, since any background noise in a clip, even if it’s very quiet, can cause an audible discontinuity.
– Christopher Lee, 2020